Using CircleCI to deploy Hexo blog to GitHub Pages - how to set it up?
I was using Travis CI to execute 271 builds and deployments of this blog. Last Friday, I decided to experiment with CircleCI and see if this could be a viable alternative to my current solution. In this blog post, I explain why I decided to switch, and how to set up CircleCI to deploy Hexo blog to the GitHub Pages without much hustle.
- Author
- Published
- Reading time6 minutes
- Discussion

Why moving away from Travis CI?
Travis CI is a great continuous integration server for any open source project. It’s easy to set up and use. It integrates with many popular building tools in a few steps. And the dashboard UI is clean and simple.
However, I have found two significant reasons to start considering alternative solutions. Firstly, the overall build and deployment times regularly kept increasing. The recent builds took 3 minutes 30 seconds, on average. The main reason for that was the time needed to set up a NodeJS build environment. The same hexo deploy command executed from my local dev environment required less than 40 seconds to complete.
Secondly, Travis CI does not support SSH keys for public projects. The only way to push changes back to the GitHub repository is such a circumstance was to use one of the Personal Access Tokens. The token grants write permission to not only your Hexo blog repository but to all repositories your GitHub account has access to. Travis CI encrypts environment variables for security reasons. However, if someone hijacks your token (in one way or another), you are in trouble.
Why CircleCI?
I did some experiments, and it turned out that CircleCI could solve both problems. The build and deploy pipeline runs more than two times faster (1 minute and 30 seconds on average). CircleCI supports SSH keys I could use to grant write permissions to a single GitHub repository.
How to set up CircleCI to deploy Hexo blog?
Now when you know, what was the reason to migrate to CircleCI, let’s take a closer look at how to set the pipeline.
Configuration
To set up CircleCI, you need to create a file .circleci/config.yml in your root folder. Here is what my configuration looks like.
version: 2.1
jobs:
  build:
    docker:
      - image: circleci/node:10
    steps:
      - checkout
      - run:
          name: Update NPM
          command: sudo npm install -g npm@latest
      - run:
          name: Install Hexo CLI
          command: |
            sudo npm install hexo-cli -g
      - restore_cache:
          key: node-cache-{{ checksum "package-lock.json" }}
      - run:
          name: Install NPM packages
          command: npm ci
      - save_cache:
          key: node-cache-{{ checksum "package-lock.json" }}
          paths:
            - ./node_modules
      - run:
          name: Generate blog
          command: hexo generate
      - persist_to_workspace:
          root: public
          paths:
            - "*"
  deploy:
    docker:
      - image: circleci/node:10
    steps:
      - checkout
      - run:
          name: Install Hexo CLI
          command: |
            sudo npm install hexo-cli -g
      - restore_cache:
          key: node-cache-{{ checksum "package-lock.json" }}
      - attach_workspace:
          at: public
      - add_ssh_keys:
          fingerprints:
            - "1d:0c:ea:28:8a:4f:f0:5d:98:e1:ca:93:0f:38:d6:ab"
      - deploy:
          name: Deploy website
          command: |
            git config --global user.name "Circle CI"
            git config --global user.email "[email protected]"
            sh deploy.sh
  verify:
    docker:
      - image: circleci/node:10
    steps:
      - run:
          name: Install BLC
          command: sudo npm install -g broken-link-checker
      - run:
          name: Check broken internal links
          command: blc https://e.printstacktrace.blog -roe

workflows:
  version: 2
  build:
    jobs:
      - build:
          filters:
            branches:
              ignore:
                - master
                - gh-pages
      - deploy:
          requires:
            - build
          filters:
            branches:
              only: develop
      - verify:
          requires:
            - deploy
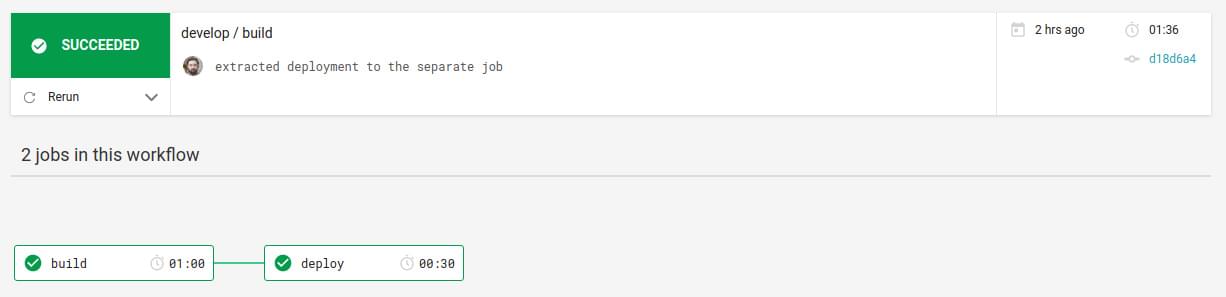
There are two jobs I defined in the pipeline — the build job, and the deploy job. The first one gets executed on every commit. It installs all required dependencies in the container and generates the Hexo blog from the source code. It also uses the persist_to_workspace step. We use it to attach persisted workspace in the "deploy" job.
The second job performs the deployment. It gets executed only from the develop branch, and it requires the "Build" job to succeed first. Here we also use a fingerprint of the SSH key used to authenticate with the GitHub repository.
What SSH key to use?
Don’t use your personal SSH key. Generate a new one with an ssh-keygen tool instead.
$ ssh-keygen -t rsa -m PEM -C "[email protected]" -f github_rsa
Generating public/private rsa key pair.
Enter passphrase (empty for no passphrase):
Enter same passphrase again:
Your identification has been saved in github_rsa.
Your public key has been saved in github_rsa.pub.
The key fingerprint is:
SHA256:L94u73iniguI1ohlvraM1dYz8DUAf42PUbYxuFLB0Zw [email protected]
The key's randomart image is:
+---[RSA 3072]----+
|    .  .o*=.     |
|     o  +=E+     |
|      o.+.o      |
|      .o.+       |
|  o .  .S .      |
|.=oo + . o       |
|oo+.+ = . .      |
|.+.o . =.+. .    |
|..+.  o.+B*o     |
+----[SHA256]-----+
After running the command, files github_rsa (private key) and github_rsa.pub get created.
Setting up CircleCI SSH permissions
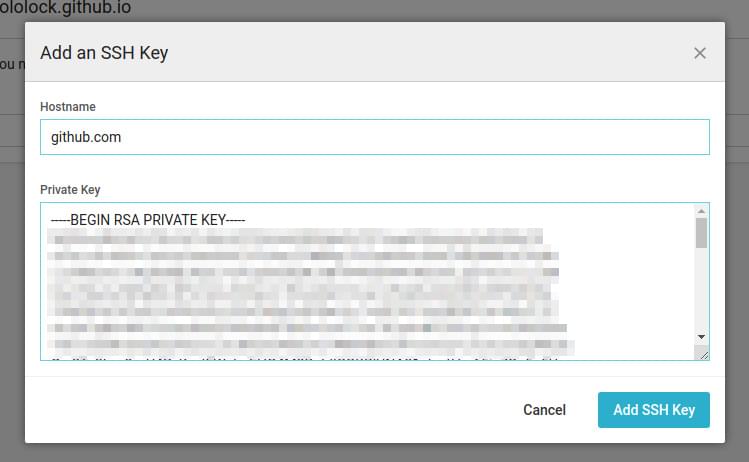
Go to your CircleCI project settings. You will find the "SSH Permissions" page under the "Permissions" label on the left side. Click on the "Add SSH Key" button. For the hostname, use github.com and paste your newly generated private key.
After adding the key, you will see its fingerprint on the SSH keys list.
Setting up GitHub deployment key
Go to your GitHub project’s settings page, and then go to "Deploy keys" section. Click on the "Add deploy key" button located in the top right corner. Use something like "CircleCI Deployer" in the title field, and paste your public key to the text area. Also, don’t forget to check the "Allow write access" checkbox.

How to skip master or gh-pages branches?
We are not done yet. If you run the CircleCI pipeline, you will see that the changes pushed back to the master branch executed the build, and it failed. You need to know that the branch that stores the generated blog does not contain any CircleCI configuration file. To stop building the master branch, we need to put the configuration file into that branch as well.
Let’s start by creating a simple configuration that ignores the master branch. Here is the source/.circleci/config.yml file we want to put into the branch.
version: 2
jobs:
  build:
    branches:
      ignore: master
    docker:
      - image: circleci/node:10
    steps:
      - run:
          command: echo 1
We are almost there. As the last step, we need to update Hexo’s configuration file. Without extra configuration, Hexo would skip generating files from the hidden directories. Also, we need to turn off rendering YAML files to JSON files. Add the following two options to your _config.yml file.
skip_render:
  - ".circleci/*"
include:
  - ".circleci/config.yml"
There is one last thing we need to do. Hexo’s Git deployer ignores hidden files by default. We need to change that, so the .circleci/config.yml file can be deployed to GitHub.
deploy:
  type: git
  repo: [email protected]:wololock/wololock.github.io.git
  branch: master
  ignore_hidden: false
And that’s it. We can commit changes and add our GitHub repository as a project in the CircleCI.

0 Comments